

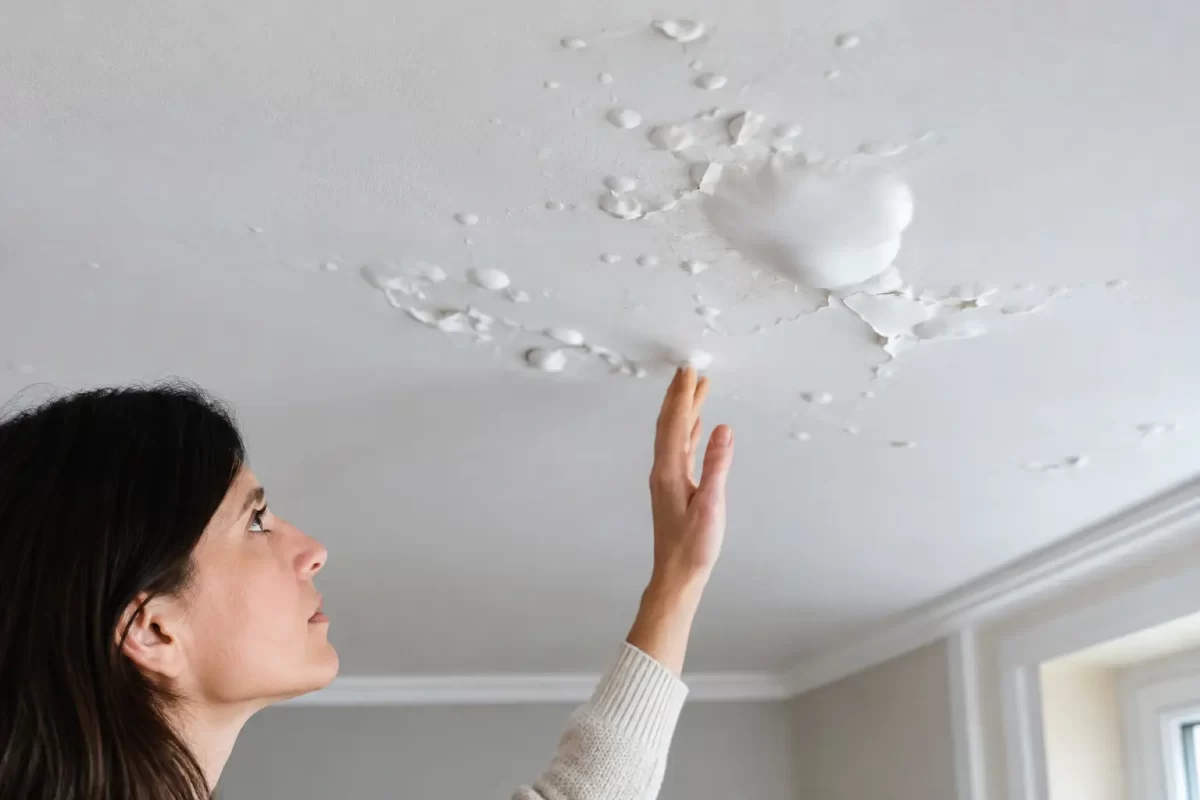
A smooth painted wall can suddenly develop small raised bubbles that spoil an otherwise tidy room. If you are asking why paint blisters, the paint itself is rarely the whole problem. Blistering usually means something beneath, behind or within the coating has interfered with its bond to the surface.
The right repair starts with finding that cause. Painting over bubbles may improve the appearance briefly, but it will not stop them returning if moisture, poor preparation or an unsuitable coating is still present.
What paint blistering actually means
Paint blisters are pockets where the paint film has lifted away from the surface. They may be soft or firm, tiny or several centimetres wide, and can appear on plasterboard, timber, rendered walls, metal and exterior cladding.
In some cases, the blister contains trapped moisture or air. In others, the paint has simply lost adhesion because the surface was dirty, chalky, too glossy or inadequately prepared. Once the coating has lifted, it cannot properly reattach by itself.
A few isolated blisters after painting may point to a local preparation issue. Widespread bubbling, recurring patches or blistering around windows, ceilings and wet areas deserve closer attention, particularly if there are signs of a leak.
Why paint blisters in homes and commercial properties
Moisture behind the paint
Moisture is one of the most common causes of paint blistering. Water can reach the surface from behind through roof leaks, plumbing issues, failed waterproofing, rising damp, damaged exterior seals or condensation. As moisture moves through a wall or ceiling, it pushes against the paint film and weakens the bond.
On the Gold Coast, warm and humid conditions can make moisture-related problems more noticeable. Bathrooms, laundries, kitchens and poorly ventilated rooms are common trouble spots, but exterior walls exposed to wind-driven rain can also be affected.
Look for clues beyond the bubbles themselves. Water staining, mould, a musty smell, peeling paint, soft plaster or discoloured ceiling areas are all reasons to investigate moisture before arranging repairs. A painter can assess the coating failure, but a plumber, roofer or waterproofing specialist may be needed to fix the source first.
Painting on a damp surface
Even without an active leak, paint can blister when applied to a surface that has not dried properly. Fresh plaster, patched areas, rendered walls and exterior surfaces after rain all need sufficient drying time.
Drying times on a paint tin are useful guides, but site conditions matter. High humidity, limited airflow and cool weather can slow curing considerably. A surface may feel dry to the touch while still holding moisture below. Applying paint too soon seals that moisture in and increases the chance of blistering later.
Heat and direct sun
Exterior paint is particularly vulnerable when it is applied to a hot surface or exposed to strong direct sunlight before it has cured. The top layer can dry too quickly, trapping solvent or moisture beneath it. As the trapped material expands, bubbles form.
This does not mean exterior painting must wait for perfect weather. It does mean the work needs to be planned around the aspect of the building, daily temperatures, humidity and the coating system being used. Experienced painters work in suitable conditions and follow the manufacturer’s application requirements rather than rushing to finish a wall.
Poor surface preparation
Paint needs a clean, stable surface to grip. Dust from sanding, grease in kitchens, soap residue in bathrooms, mould, chalky old paint and loose material can all prevent proper adhesion.
Glossy surfaces can also cause trouble if they have not been sanded and primed correctly. Paint may appear fine at first, then lift in patches once temperature and humidity change. Similarly, applying a new coating over flaking or poorly bonded old paint only transfers the weakness to the new finish.
Preparation is not the most visible part of a paint job, but it has a major effect on how long the final result lasts. Cleaning, sanding, repairing damaged areas and choosing the correct primer are often what separate a durable finish from one that fails early.
Incompatible or low-quality coatings
Not every paint product works over every existing surface. For example, a coating may react poorly when applied over an unknown previous paint type, an unsuitable primer, wallpaper adhesive residue or a surface with contaminants. Using the wrong product in a high-moisture room can also lead to early failure.
A quality paint system is more than a top coat. It includes the right preparation products, primer or sealer where required, and suitable top coats applied at the recommended spread rate. Applying paint too thickly can be just as problematic as applying too little, because thick coats may skin over before the layers underneath can cure.
How to tell whether the problem is serious
Not every blister requires major building work, but it is worth taking a careful look before scraping anything back. Press lightly around the affected area. If the wall or ceiling feels soft, damp or swollen, stop and investigate the moisture source. Repainting alone is not the answer.
Blistering in a bathroom after a long period of poor ventilation may be manageable once the room is properly dried, cleaned and prepared. Blisters beneath a ceiling, around skylights or beside external openings are more concerning because they can indicate water entry.
For commercial premises, recurring blistering can affect presentation, tenant comfort and maintenance costs. Addressing the underlying issue early is usually less disruptive than allowing a small patch to turn into damaged plasterboard, mould growth or a larger repainting project.
How to repair blistered paint properly
A lasting repair follows a straightforward order: fix the cause, allow the area to dry fully, remove failed paint, prepare the surface, prime if required and repaint with an appropriate coating. Skipping the first step is the reason many touch-ups fail.
Once the source of moisture or contamination has been resolved, loose and blistered paint needs to be scraped or sanded back to a firm edge. The area can then be filled where necessary and sanded smooth. If staining remains from a previous leak, a suitable stain-blocking primer may be needed before top coating.
The correct primer depends on the surface and condition underneath. Bare plasterboard, patched plaster, raw timber, metal, chalky masonry and water-stained areas all have different needs. This is where professional advice prevents a quick repair from becoming a repeat job.
Finally, apply the chosen paint in appropriate weather and allow each coat to dry as specified. In bathrooms and laundries, ensure ventilation is working properly after the room is back in use. Exhaust fans should vent effectively, and doors or windows can be opened when conditions allow to reduce lingering humidity.
Can you paint over blisters?
Painting directly over blisters is not a reliable repair. The new coat will follow the uneven surface and may soon lift with the failed paint beneath it. Even if the bubbles are small, the affected coating should be removed until you reach a sound, well-adhered surface.
There is one exception worth understanding: a very minor imperfection in a new coat can sometimes be rubbed back and recoated if there is no sign of moisture, contamination or broader adhesion failure. The decision depends on what caused the defect, not just how it looks.
Preventing paint blistering on the next project
Good preparation and sensible timing prevent most blistering. Before painting, surfaces should be clean, dry and sound. Any mould, leaks, cracks, failed sealant or deteriorated exterior areas should be dealt with first.
For interior work, give fresh plaster and repairs adequate drying time, use suitable primers and maintain airflow while paint cures. For exterior projects, avoid painting in rain, on saturated surfaces or in harsh direct sun when the wall is excessively hot. The product specifications matter, but so does the judgement to adapt to the conditions on site.
If you have recurring paint bubbles, visible water staining or a large affected area, it is worth having the surface assessed before committing to a repaint. A professional painter can identify preparation and coating issues, explain the repair scope clearly and help achieve a finish that looks right and stays that way. Taking the time to solve the cause now protects both the appearance of your property and the value of the work done next.


